Create a canvas of color with this popular tissue paper painting activity! You may have also heard this method referred to as bleeding tissue paper art or tissue paper transfer art.
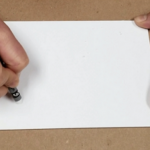
Choose whether you’d like to use the crayon resist for your project. If so, first you will draw a design (words, patterns, etc) with white crayon on the watercolor panel. This design will show up after you apply the squares. NOTE: Because you are drawing white on white, your drawing won’t be visible until the final step.
Pre-wet the watercolor panel by spraying it with a spray bottle filled with water. You can also choose to use a paintbrush if you’d like.
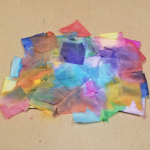
Apply the tissue paper squares randomly or in a planned arrangement. We recommend spraying or painting some more water over the squares to accelerate the color “bleeding”.
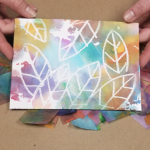
For best results, allow the water to dry before removing the squares.
Once you remove the squares, the color will have transferred onto the watercolor panel, revealing your drawing and the color from the squares!